|
Enter the Normal Map
So how does this apply to real-time models? Up until just recently, most real-time video game models have been lit using per-vertex Gouraud shading (pronounced Guh-row). That’s a big fancy title that basically means that only the vertices were lit with the N dot L formula (only the corners of the polygons) and then all the pixels on the polygons in between got their lighting by interpolation. So if my polygon had one dark vertex and one bright vertex, the pixels in between would just be a linear gradient from light to dark.
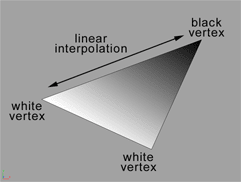
It’s a short cut that allows the graphics hardware to do a lot less calculations because it’s only doing the N dot L thing at a few points instead of all of them. Then it makes a quick estimate of how the surface in between the verts should be lit. This method works pretty well, but it doesn’t look as realistic as doing the lighting calculation at every pixel.
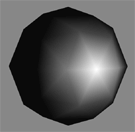
The image above illustrates the problem with Gouraud shading. This low-poly sphere is lit per-vertex using Gouraud shading. It's obvious that the linear interpolation isn't good enough to make the lighting look convincing.
Sometimes you get the lighting you want with Gouraud shading, but sometimes you get some strange artifacts that don’t look good at all. If the triangles in your model are large your lighting will look really poor. You can only put detail in your model using more polygons so you’re limited by the number of polygons the game engine can push.
What’s the solution to these problems? Per-pixel lighting! Starting with the GeForce2 graphics card, graphics hardware now has the ability to calculate the N dot L lighting formula at every pixel instead of at every vertex. This eliminates the problems caused by Gouraud shading and opens up the door to some really cool possibilities.
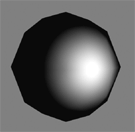
This low-poly sphere is lit per-pixel. Even though it's still a low poly sphere, it's shading is nice and smooth because the lighting calcualtions are done for every pixel.
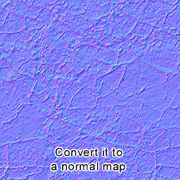
Per-pixel lighting uses an RBG texture to encode the data needed to create surface normals in a regular texture map. This texture containing surface normal data is called a normal map. The red, green, and blue channels of the normal map represent the X, Y, and Z values of the normal vector. Here's an example of a normal map that I created:
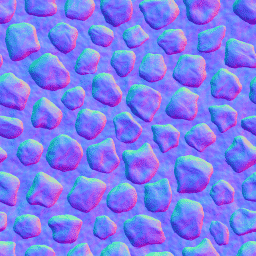
Remember when I said that the surface normal always goes perpendicular to the surface? That wasn’t necessarily true. When you use normal maps, you can make the normal at each pixel go in whatever direction you want. In the image above we can see that the light blue pixels (R 127, G 127, B 255) represent normals that are pointing straight out of the screen. The pink pixels represent normals that are tweaked to the right. Green pixels represent normals that are tweaked up. Purple pixels represent normals that are tweaked down, and dark blue/green pixel are normals tweaked to the left.
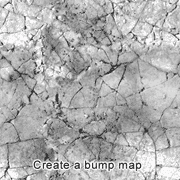
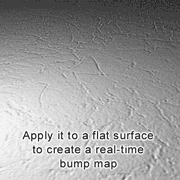
You can make it look like your surface has lots of extra bumps, or scratches, or any other type of surface detail simply by editing the normal at each pixel so they make the surface appear to go in directions that it really doesn’t. The tweaked normals fool the eye into believing that the surface has more detail than it really does because of the way the lighting reacts with the normal at each pixel. If you’ve ever painted a bump map for a non-real-time model, you already understand this principle. You can use normal maps to achieve the exact same results as a bump map – only in real-time. In fact, it’s very easy to just paint a plain old bump map for your real-time model and then convert it to a normal map. Then apply the normal map to your model and you’ve got bump mapping in real time! The first half of the tutorial will show you how to do this.
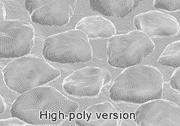
An even cooler use for a normal map is to make a low res model look almost exactly like a high res model. This type of normal map is generated by the computer instead of painted like a bump map. Here’s how it works: First you create two versions of the model – a high polygon version (which can contain as much detail as you want) and a low polygon version that will actually get used in the game. Then you align the two models so that they occupy the same space and overlap each other.
Next you run a special program for generating the normal map. The program puts an empty texture map on the surface of the low res model. For each pixel of this empty texture map, the program casts a ray (draws a line) along surface normal of the low res model toward the high res model. At the point where that ray intersects with the surface of the high res model, the program finds the high res model’s normal. The idea is to figure out which direction the high res model surface is facing at that point and put that direction information (normal) in the texture map.
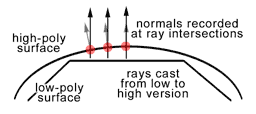
Once the program finds the normal from the high res model for the point, it encodes that normal into an RGB color and puts that color into the current pixel in the afore mentioned texture map. It repeats this process for all of the pixels in the texture map. When it’s done, you end up with a texture map that contains all of the normals calculated from the high res model. It’s ready to be applied to the low res model as a normal map. I’ll show you how to create this type of normal map in the second half of the tutorial.
Back Next
Page 1: Introduction
Page 2: Enter the Normal Map
Page 3: What You'll Need
Page 4: Using Normal Maps for Bump Maps
Page 5: Normal Maps for High Poly Detail
Page 6: Applying Normal Maps to Your Model
Page 7: Additional Tips and Tricks
Page 8: Links to Additional Information
|