Introduction
For the last 8 years or so, video game artists have been creating real-time 3D content in 3D authoring tools such as 3DS Max, Maya, Lightwave, etc. Because of the differences between the target game engine and the 3d authoring tools abilities, artist have only been able to imagine what their creations would finally look like. The only only way to know for sure would be to export the art and get it up and running in the game engine itself. Depending on the game engine, this would often require help from level designers or programmers. This meant that the artist was never really sure exactly what he was going to get when his model was finally working. He just had to guess. In the last year, several of thethe leading 3D apps have added features that overcome this roadblock and allow game artists to see their model, as the build it, exactly as it will appear in the final form, running in the game.
Discreet has added the funtionality into 3DS Max to run HLSL shaders in the FX format in the real-time viewport. This means that, as long as their game engine uses the FX format (a standard developed by Microsoft, ATi, and Nvidia), the artists can use the very same shaders in Max that the game will use for their art. In this tutorial I'll explain the steps required to apply a real-time HLSL shader to your model, and I'll also show you how to adjust the shader settings so you can get the results you want from the shader.
Applying HLSL Shaders
An HLSL shader can be applied to a model in the real-time viewport by using a special material type. Follow the steps below to apply a real-time shader to your model:
- Open the model that you want to a apply a shader to in 3DS Max version 6 or version 7. (I recommend version 7. A lot of the bugs with real-time shaders have been fixed in this latest version.)
- Press 'M' to bring up the Material Editor window.
- Select an unused grey ball in the Material pallete at the top of the window and type in a name for it in the drop down menu in the middle of the window.
- Select your model in the viewport and hit the "Assign Material to Selection" button in the middle of the Material Editor window to apply this material to your model.
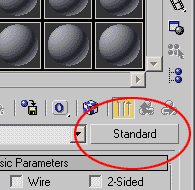
- Now we need to change the material to a DirectX 9 Shader. Click the button pictured below to bring up the Material Browser
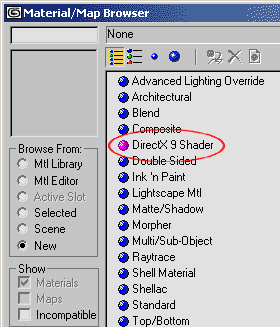
- Choose "Direct X 9 Shader" as pictured below and then click OK. Now you've converted your material to a DirectX 9 Shader.
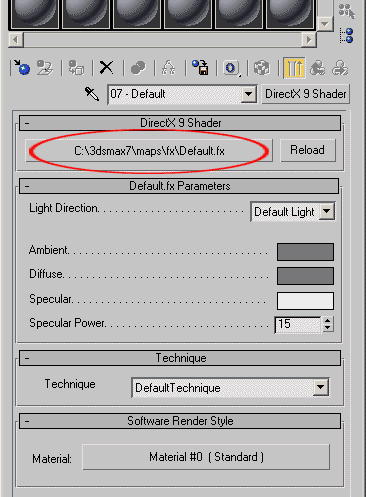
- The DirectX 9 material loads the shader "default.fx" by default. You can use that one if you want, but I recommend that you find one that fits your needs better. If you know how, you can write your own. 3DS Max comes with a few you can choose from. I've written a library of shaders also. You can find them here. Click the button pictured below to load the shader you want.
All of the instructions in the next part of the turorial will deal with my "Normal Map Specular" shader, so you should grab that one from here and load it.
Nice job! You've now got a model with a real-time HLSL shader applied to it running in the viewport of 3DS Max. It probably doesn't look the way you want it to yet, though. Follow the instructiuons below to adjust the setting on the shader to get the look that you want.
Adjusting Shader Settings
One of the cool things about these real-time shaders is that each one comes with it's own unique set of settings and controls that you can use to achieve the look that you want for your model. Max's interface in the Material Editor is dynamically adjusted to display the controls and settings that each shader calls for. Once you've followed the steps above and applied my "Normal Map Specular Shader" to your model, follow the steps below to adjust the settings.
NOTE: The steps below are specific to my Normal Map Specular shader, but all HLSL shaders will have colors, textures, and/or values that can be adjusted the same way.
- The first settings are "Ambient Color" and "Diffuse Color." When you click on the color rectangle to the right of each, it will open a color picker and allow you to choose a color. Ambient Color affects the whole model regardless of the lights in the scene. Diffuse Color will only affect the model in the areas that are lit by the light source. (If you haven't done so already, add an omni light to your scene to light your model.)

- The next setting is "Diffuse Texture." This is the standard texture map that determines the color of the surface at each pixel. Click on "None" to find an image to use as the diffuse texture. Once you find the one you want, its name will replace the "None" on the button.

- The next two items deal with the shininess or specular of the shader. They are "Specular Color" and "Shininess." Most objects will have a specular color of white or grey, but you can also set this to some other color to achieve some intereseting looking surfaces. I lower "Shininess" value will make the specular highlights more broad, while a higher value with make the highlights sharp and focused. Smaller specular highlights make the object look more shiny.
Remember that you can also use the alpha channel of the diffuse texture to determine how bright or dark the specular is at each pixel.

- The next item is a texture map slot called "Normal Map." This slot works just like the Diffuse Texture slot except you need to put a normal map in it. For more information about what normal maps are and how to make them, you can read by tutorial here.

- The final setting in the list is called "Light Position." This one is a drop down box that lists all of the lights in your scene. In order to make the shader faster, I've only written it to work with one light source. You can choose the light source you want to use from this drop down box. The shader only works with omni lights. If you choose a directional light, it will treat it like an omni.

- There are two more items in the material roll-out. The first is called "Technique." Some times shaders have several techniques, or different modes that they can run in. For example, a shader programmer might include an high quality, expensive version of a shader, and a lower quality, cheap version of the shader. This drop down allows you to choose which technique to use. All of the shaders that I've written only have one technique so far.

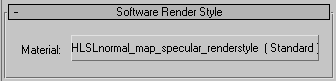
- The last item on the roll-out is called "Software Render Style." It has a material slot. The material in this slot is the one that Max will use when you use the software renderer to render your scene. You can put any max material in this slot. I usually try to make the material in this slot looks as much like my real-time shader as I can so that I get the same image when I render the scene as I get in real-time.
That's it! Now you know the basics of applying an HLSL shader and adjusting the settings to get the look you want. At this point it would probably be a good idea to test out some of the shaders in my library (get them here) as well as some of the shaders that come with Max. That way you'll get an idea of some of the neat things that these shaders can do.
The most powerful things about real-time HLSL shaders in Max is that you can write them yourself. That gives you total control over what your objects and characters will look like. I've mainly taught myself how to write shaders by reading some books on the subject and looking at other people's shaders. I bet you can do the same. Give it a shot!
Back