Introduction
In the last 10 years or so we’ve seen lots of video games released that use low poly count models for the game play and then tell the story using pre-rendered cinematic sequences. The characters in the cinematics always look really nice with lots of detail and realism, but as soon as the game play starts again, the model is back to being low poly and very chunky looking. Wouldn’t it be cool if you could make your 1500 poly real-time model look like your 2 million poly cinematic (software rendered) model? That is the main goal of using normal maps. The idea is that you take all of the detail from the high poly model and put it in a normal map. Then you apply the normal map to the low res model just like you would add a texture map. Now you have a low res model that looks a lot like the high res one. It’s not perfect, but it’s a pretty good trick that makes low res models look A LOT better than they have before. The aim of this tutorial is to introduce you to creating normal maps and help you understand the principles involved. Because normal mapping is a bit technical in its approach, I want to explain it in such a way as to allow game artists without a lot of technical background to understand the technique and be able to use it.
Before we continue, I would recommend that you download “Polybump Previewer” from the Crytek web site here. It’s a real-time demo that does a good job of showing off the power of normal maps.
Note:
I’ve learned most of this stuff on my own through research on the Internet and by using trial and error. I’m an artist myself, not a programmer. If you find any information in this tutorial that is just plain wrong or needs some correction or editing, please let me know. I’m no expert and I’m still learning. If you have more information for me (or better information!) please let me know. I’d love to hear from you. Also, if there’s something in here that I haven’t explained very clearly, tell me and I’ll try to provide more details.
How Lighting Works
Before talking about normal maps specifically, it’s important that I give a general overview of the process of lighting a 3d model so you can have a good foundation for understanding what the normal maps are doing. This is a very simple explaination. If you want to learn more, just follow the links in the text.
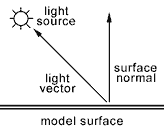
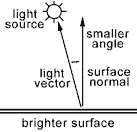
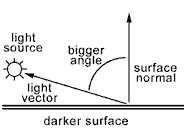
So how does lighting work? How do we tell how dark or bright to make each point on the screen so that the object looks like it’s being lit by the lights in the scene? First it’s important to know the direction that each point on the surface is facing. The direction that a point on the surface is facing is called a normal. You can imagine a normal as a line extending from the surface point. The line is perpendicular to the surface. Next we need to know where the light is in our scene. We create a line from the point on the surface to the position of the light. This line is called the light vector. (Vector is a fancy math term for line.) So now we have two vectors coming out of our surface point, the light vector and the normal. If we measure the angle between the two lines then we know how to light the point.
N is the direction that the surface is facing (the surface normal) and L is the line that we draw from the surface point to the light source (the light vector). “Dot” is the way we measure the angle between the two lines. It’s a dot product of the two vectors.